Schedule Next Contact
The Schedule Next Contact form is displayed in several
situations where Collect! expects you to confirm details
for a next contact. The Schedule Next Contact title bar
will let you know which type of situation you are
handling. You can confirm and/or edit the details. Press
the NEXT button to schedule the contact as displayed.
These are the situations where this form is displayed:
- Create New Contact
When you complete a contact for a debtor through the
WIP List and there are no pending contacts for this debtor.
This occurs UNLESS you have switched ON "Future
contact not required" in the WIP Options.
- Next Pending Contact
When you switch ON "Always show next contact when" in
the WIP Options. The Schedule Next Contact form will
display showing you the next future contact for this debtor.
This occurs whenever you exit from a debtor in your
To Do List, even when there are pending contacts for
the debtor.
- Confirm Contact Details
When you choose "Prompt to confirm details" in a
Contact Plan event. Whenever the plan is run, the
Schedule Next Contact form will display when the
event is executed.
The details that you see in the Schedule Next Contact
depend on the type of situation and your default settings.
We will now describe each of these.
Create New Contact
The title bar lets you know this is a brand new contact
for the account.
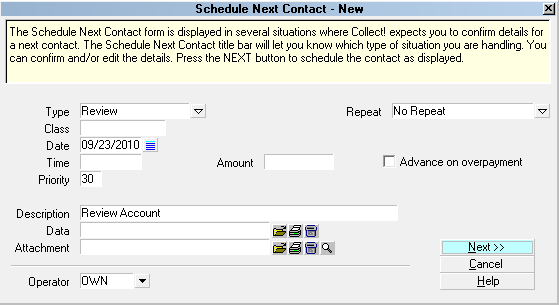
Schedule Next Contact - New
Schedule Next Contact form prompts you to create a
new contact if there are no pending contacts for the
account.
 Types of contacts that Collect! considers are
based on your WIP Options and WIP Reload Filters
settings. The type of contact that is created also uses
default settings from your WIP Options.
Types of contacts that Collect! considers are
based on your WIP Options and WIP Reload Filters
settings. The type of contact that is created also uses
default settings from your WIP Options.
Press NEXT to schedule the new contact.

Next Pending Contact
The title bar lets you know this is the next pending
contact for the account.
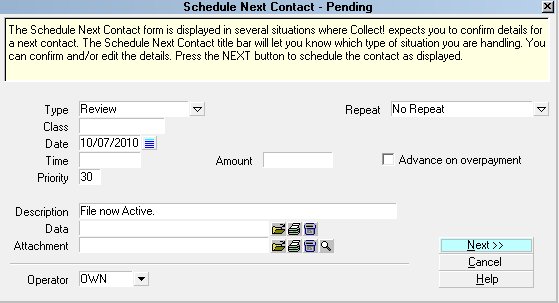
Schedule Next Contact - Pending
When the Schedule Next Contact form is showing you
the next pending contact, it shows you the earliest
In Progress contact for the account.
Types of contacts that Collect! considers are
based on your WIP Options and WIP Reload Filters
settings.
Press NEXT to close the Schedule Next Contact form.
Confirm Contact Details
The title bar lets you know that you being prompted
to confirm details for an event in a contact plan you
are running.
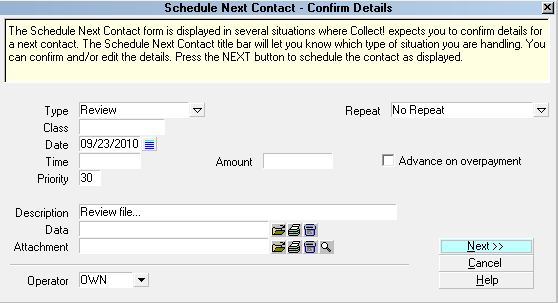
Schedule Next Contact - Confirm Details
When the Schedule Next Contact form prompts you to
confirm details, it is showing you details set in the
contact plan you are running. You can confirm/edit the
details as needed.
Press NEXT to execute the plan action or CANCEL
to stop the plan and close the Schedule Next Contact form.
Date
This is the date the contact is scheduled to occur.
Press F2 to pick a date from the Calendar or type
the date in MM/DD/YY format.
 Type 5 in the date field for 5 days from
now, or 3 for 3 days.
Type 5 in the date field for 5 days from
now, or 3 for 3 days.
Time
Enter the time of day for the contact.
This is in 24 hour format. In other words if you type 4
it's 4 AM. Type 16 for 4 PM, 18 for 6 PM and so on.
You can set the time to the minute. For example, you could
type 16:25 and the call will pop up at 4:25 PM.
It is not compulsory to enter a time. Timed
contacts are important when you must deal
with a Debtor at a specific time. (Perhaps
he is only home at 7 PM to answer calls.)
Then you would enter 19:00 in the time field
of the contact and a prompt will pop up on your
screen at that time to go to the contact.
This only works when you are working accounts
from your WIP List.
Type
This is the type of contact, whether Phone, Letter,
Review or Other. Click your mouse on the field, or
press F2 to display the list. If the activity is a review
make sure you set the Operator field to the ID of
the operator who will review the file.
Class
This field allows you to enter a Class for this contact.
This will be written to the contact record.
Amount
This field holds a currency value. When the
contact type is a Promise, enter the amount
promised and expected to be received on a
specific date. Collect! will use this value for
calculating promise payments. When the contact
type is a Transaction, enter the amount to be
posted for the transaction.
Advance On Overpayment
When this switch is set, a Promise type contact will
consider overpayments as prepayments for future
promises. For instance, if you create a promise
for $100 and the Debtor pays $200. When you
post the $200 transaction, the Promise Date
on the Debtor form will move forward two payment
periods. By default, this Promise Date moves
forward one period whenever a payment is posted.
This check box is visible only when you have
selected "Promise" in the Type field.
Description
This is a description of the contact. If it is a Letter,
then press F2 to pick from the list of letters. If it is a
Review then type a note to the person reviewing
the file. Otherwise, simply enter a brief description
of the contact.
Data
The Data field is typically used for information related
only to this particular contact. This information is stored
in a metafile within the contact record. This field will display
the file number by default, when you create a new entry.
You can change the filename displayed in the field to
anything you want, it is only a description. This field will
be empty if there is no additional information for this contact.
The Data field provides a convenient and flexible way
of passing messages around your office, or tracking details
of specific activity occurring on an account. Adding
information here keeps the related information together.
To the right of this field, there are three buttons. Use these
buttons to open, print or delete the information contained
in the metafile.
Attachment
This field allows you to select an attachment within the
debtor's folder, or to search your system for a file to
attach. The attachment will be placed in the
CV11\bin\global\masterdb\attach\debtor folder in a subfolder
by file number, ..\4000\4356.3.
To the right of this field, there are four buttons. Use these
buttons to attach and open a file, print, delete or attach the
file without opening it.
Operator
This is the ID of the Operator who is responsible
for the contact. The contact will appear on that
Operator's To Do list on the scheduled date and
time. By default, the operator displayed in the
Debtor's Operator field is entered here. To select
someone else to assign the next contact to, press
F2 and select their ID.
Priority
Priority is automatically set by Collect! using your
WIP Options settings. This may be modified manually
if needed to control where it displays in the Work
In Progress (WIP) List. The WIP List is displayed in
order of Date, Time, Priority, Contact Type, and
finally the Debtor's Name.
Repeat
If you want this contact to repeat, choose a repeating
period for the contact. This can be used, for example,
to repeat printing a letter or posting a promised payment.
Repeat occurs when you print a letter, post a promised
payment or batch process previously scheduled contacts.
The Repeat setting is read when payments are posted.
If a repeating Promise exists, its date is forwarded
to the date required by the Repeat field provided that
a full payment of the promised dollar amount is
received within the Repeat period.
As of CV11.6.2.9, the Repeat intervals of First
Day of of the Month and Last Day of the Month
have been added.
Max Intervals
This field is visible when you select a REPEAT
value. Collect! uses it to determine how many
times this Contact is repeated.
Number Of Days
Enter the number of days to repeat the contact. This
field is visible only when you have selected "Custom"
in the contact's Repeat field. It applies to Promise
contacts.
Help
Select this button for help on the
Schedule Next Contact form and
links to related topics
Cancel
Select this button to cancel the contact you are
creating and close the Schedule Next Contact
form. This will return you to the Debtor form.
If you are running a Contact Plan, this will
cancel the plan. You may need to examine the
account's Contact list to make sure you are
satisfied with the entries.
Next
Select this button after you have entered all contact's
details. A contact will be scheduled based on the
information you entered in Schedule Next Contact
form and you will advance to the next Debtor in your
WIP List.
If you are running a Contact Plan, the contact will
be scheduled and the plan will proceed to its next
event, if there is one.
See Also
- Contact Basics
|
Was this page helpful? Do you have any comments on this document? Can we make it better? If so how may we improve this page.
Please click this link to send us your comments: helpinfo@collect.org